
Dryer Vent Cleaning in Kohler, WI

Dryer Vent Cleaning in Kohler, WI
Keeping your dryer vent clean is one of the most effective, low-disruption ways to protect your Kohler, WI home from preventable fires and to reduce energy costs. In a climate with long, cold winters and higher indoor drying demand, clogged dryer vents increase drying times, raise energy bills, and create a serious fire risk.
Why professional dryer vent cleaning matters in Kohler, WI
- Fire prevention: Lint is highly combustible. Restrictive vents let lint build up inside ducts where heat accumulates and can ignite. Professional cleaning reduces that risk substantially.
- Efficiency in cold months: Kohler winters mean more reliance on your dryer. Reduced airflow prolongs drying cycles and puts more wear on the appliance.
- Indoor comfort and air quality: Poor venting can allow moisture and lint into attics, crawlspaces, or living areas, encouraging mold and reducing indoor air quality.
- Appliance longevity: A dryer that has to work harder to dry clothes runs hotter and breaks down sooner.
Common dryer vent problems we see in Kohler homes
- Lint accumulation in the transition duct or long exterior runs
- Collapsed or flexible plastic ducting that traps lint
- Detachment of the vent from the dryer or exterior termination
- Clogged exterior vent hood or animals nesting in vent terminators
- Vent runs with too many turns or excessively long runs restricting airflow
- Moisture or ice buildup at the external vent in winter
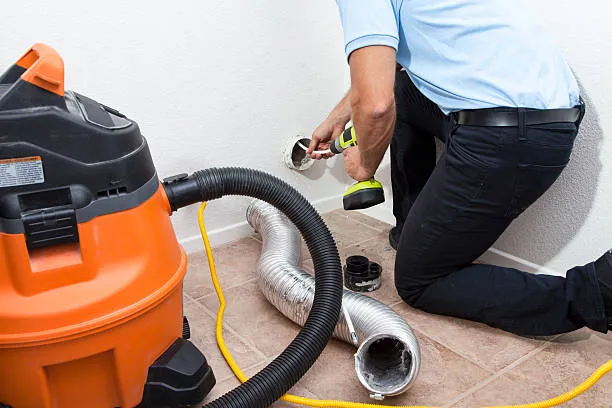
Inspection and cleaning process (what to expect)
A professional service follows a systematic process to ensure safety and verification of results.
Initial on-site inspection
- Inspect the dryer, transition hose, and accessible vent termination.
- Check dryer operation and note cycle times and dryer temperature.
Lint removal at access points
- Disconnect the dryer and remove the lint from the back of the dryer and transition hose.
- Clean lint traps and housings.
Vent chase inspection
- Access attic, crawlspace, basement, or exterior chase to look for visual signs of buildup, crushed ducting, or animal nests.
Rotary brushing or air-whip cleaning
- Use rotary brush systems or air-whip tools sized to the duct to dislodge lint from the entire run.
- Work from both the dryer and the exterior where feasible to remove heavy buildup.
High-powered vacuum extraction
- Vacuum the released lint to prevent redistribution and ensure the duct is clean.
Camera verification
- Run a duct camera to verify the duct is clear end to end and to spot damage or sharp bends that require repair.
Airflow measurement and dryer reassembly
- Measure airflow improvement and reattach dryer.
- Confirm normal dryer operation and provide documentation of work performed.
Recommended cleaning frequency and warning signs
- Recommended baseline: At least once every 12 months for most households.
- More frequent cleanings (every 6 to 9 months) for:
- Large families or heavy dryer use
- Homes with long vent runs, multiple turns, or shared laundry rooms
- Homes with pets or frequent towels and bedding washes
- Signs your dryer vent needs attention:
- Laundry takes longer than usual to dry
- The dryer or surrounding area becomes excessively hot
- Burning or musty odors during operation
- Lint buildup around the dryer or at the exterior vent
- The exterior vent hood does not open properly
Expected benefits after professional cleaning
- Faster drying times — cleaning can reduce cycle length by 20 to 30 percent in many cases.
- Lower energy use — less run time equals lower utility costs.
- Decreased fire risk — removing accumulated lint eliminates a major ignition source.
- Extended appliance life — reduced strain on the motor and heating elements.
- Improved indoor air quality — less lint and moisture escaping into conditioned spaces.
- Verified results — camera inspection provides visual proof of a clear vent.
Safety and code compliance
- Proper venting requires metal ducting (rigid or semi-rigid) and termination to the outside. Flexible plastic or foil ducting is not code compliant in many jurisdictions and increases fire risk.
- Vents must terminate to the exterior, not to attics or crawlspaces, and should have appropriate backdraft dampers and screens to block pests while allowing airflow.
- Too-long vent runs and excessive elbows reduce airflow and may violate local installation guidelines.
- Professional cleaning services will flag and recommend repairs or replacements needed to bring vents up to safety and code standards. Verification via camera also documents compliance and safety improvements.
How pricing is typically determined
Rather than a one-size-fits-all price, professional dryer vent service is based on factors that include:
- Length and complexity of the vent run
- Access difficulty (attic, crawlspace, multiple floors)
- Amount of accumulated lint or presence of nests/damage
- Need for camera inspection and any recommended repairs or duct replacementA clear estimate should be provided after an initial inspection that details the scope of work included.
Before and after examples
- Example 1: Before — 45 minute average drying cycles, exterior vent heavily clogged. After — 30 minute cycles, measured airflow improved 35 percent, no visible lint in camera footage.
- Example 2: Before — Dryer felt hot to the touch and trapped lint behind unit. After — Transition replaced with rigid ducting, complete brush and vacuum, dryer runs cooler and operator-reported odor eliminated.
- Example 3: Before — Exterior vent flap stuck and bird nesting present. After — Nest removed, vent cleaned end to end, exterior termination replaced with bird-proof cap.
Frequently asked questions
Q: How long does a professional dryer vent cleaning visit usually take?
A: Most straightforward cleanings take 45 to 90 minutes. Complex or multi-level vent systems and repairs extend that time.
Q: Will cleaning damage my dryer or ducting?
A: When performed by trained technicians using correct tools, cleaning is safe and helps prevent damage. The inspection step will identify fragile ducting that should be repaired or replaced.
Q: Can I clean the vent myself?
A: Homeowner maintenance like cleaning the lint screen after every load is essential, but full vent runs require specialized rotary brushes, high-powered vacuums, and camera verification to achieve a complete and safe cleaning.
Q: Do you check for code compliance?
A: Professional services include visual and camera inspections and will recommend corrective work to meet safety and code expectations for vent materials and termination.
Q: How will I know the job is done right?
A: A complete service includes visible removal of lint, documented camera footage showing a clear duct, and measured improvement in airflow or dryer cycle times.
Q: Will cleaning prevent all dryer-related problems?
A: Cleaning greatly reduces fire risk and efficiency problems but does not replace regular appliance maintenance. Persistent mechanical issues with the dryer should be addressed by an appliance technician.
This information is tailored for Kohler, WI homes where winter drying demand and local building characteristics make regular dryer vent maintenance especially important. Professional inspection, cleaning, and verification ensure safe operation, improved efficiency, and peace of mind for homeowners.
.png)
The Healthy Home Club is a year-round home maintenance plan designed to prevent breakdowns, catch issues early, and provide priority service when needed.
Essential Plan
$29/month
Annual HVAC, plumbing & electrical inspections
Priority scheduling
Priority scheduling
Reduced diagnostic fees
10% off repairs
Complete Plan
$39/month
Everything in essential
No after-hours diagnostic fees
15% off repairs
Extended warranty eligibility
Total Protection $49/month
Everything in complete
Annual water heater flush
Advanced system checks
1 free emergency dispatch per year
VIP priority scheduling
HVAC
Seasonal tune-ups to keep systems running efficiently
Plumbing
Annual whole-home inspection to catch issues early
Electrical
Safety inspection to identify risks
Most Home Breakdowns Are Preventable
Most issues don’t happen overnight — they build over time. The Healthy Home Club helps catch problems early so homeowners can avoid unexpected repairs.
Member Benefits
- Priority service
- Discounts on repairs
- No after-hours fees
- Fewer unexpected breakdowns